Arun Agrawal’s Blog

Ruby on Rails Developer

OAuth With OmniAuth and Twitter

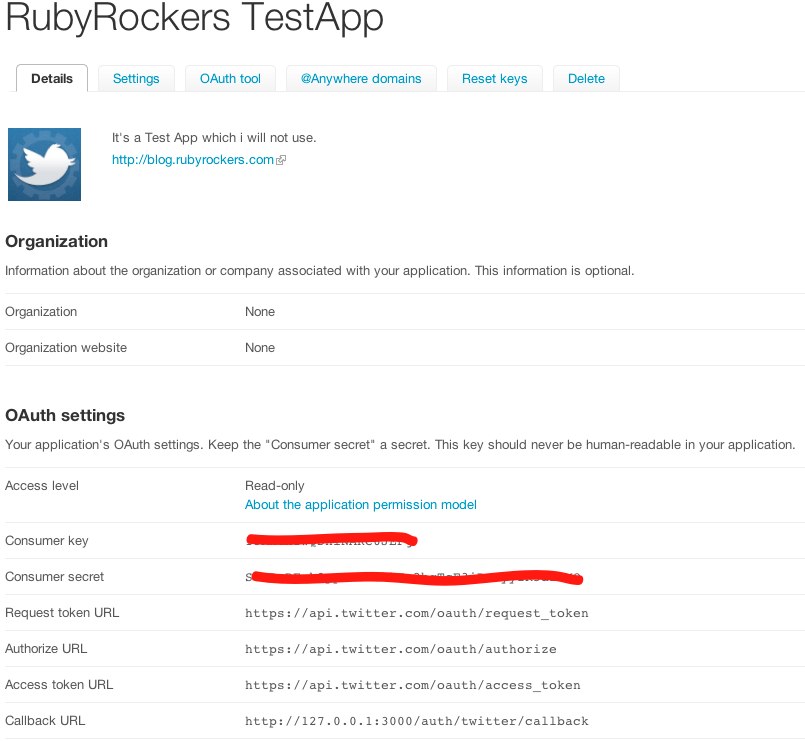
Hi Folks, If you want to have OAuth in your Rails Application with twitter. OmniAuth is the best gem to use. OmniAuth provides list of  Strategies to use many OAuth for your application. Here is the List of Strategies. Showing here a Twitter Strategy for OmniAuth. Twitter uses the OAuth 1.0a flow, you can read about it here: https://dev.twitter.com/docs/auth/oauth For using Twitter OAuth you have to register a Application on Twitter (https://dev.twitter.com/apps/new) Once you done with the registration obtain the Consumer Key and Consumer Secret from the Twitter Application. Be sure to put the callback URL in the application. Callback URL is the URL where user will land after successful authentication. Showing an image here how to register an Application with Twitter.   Here showing some of the steps : Generate a new Rails Application:
rails new TwitterAuth
Update your gemfile add omniauth-twitter gem into that
gem "omniauth-twitter"
Create a config/initializers/omniauth.rb file. Paste your key instead of XXXX, and secret instead of YYYY
Rails.application.config.middleware.use OmniAuth::Builder do
  provider :twitter, 'XXXX', 'YYYY'
end
All Done! Just start the server
bundle exec rails server
And hit the URL
http://localhost:3000/auth/twitter
And you should be landing on the Twitter Authorize page! After success your app will redirect to your given callback URL with information and token! At OmniAuth.org you can try out different -2 Strategies.   Useful links :

Respond to Custom Formats in Rails

We usually respond some of the known formats in Rails Application like HTML, XML, JavaScript, RSS and some custom. Have you tried to use your own custom format for your Rails Application? Yes you can use your custom format in Rails Application. Here showing a simple Rails Application with responding custom formats. Get a new app
rails new music_library 
Get a scaffold into App
rails generate scaffold mp3 title:string url:string description:text 
Ok so you are ready to serve some music on your app with some formats! Now you have to register MIME types in the Rails Application. For that open up Rails.root/config/initializers/mime_types.rb
Mime::Type.register 'audio/mpeg' , :mp3
Now you can serve .mp3 and content For that your respond block should look like
def show
  @mp3 = Mp3.find(params[:id])
  respond_to do |format|
    format.mp3 { redirect_to @mp3.url }
  end
end
Now if you call this action with .mp3
http://localhost:3000/mp3s/1.mp3
You will redirect_to @mp3 url. Happy adding custom formats!!

X-Request-Id Tracking and TaggedLogging in Rails3.2

Rails 3.2 will come with X-Request-Id tracking and TaggedLogging support!! Recently DHH added this feature here! This makes it easy to trace requests from end-to-end in the stack and to identify individual requests in mixed logs. If you have application on SAS model. Where you have logs filled with mixed request for all your customers. May be you need to filter out requests start with some specific subdomain. TaggedLogging will help you in that. Where as the X-Request-Id feature will help you to track log with the same request. So in mixed logs you can easily find out the unique id logs for a request. It will tag the log with the unique id for that request in the log. So later you can easily trace them down. May be later on you can add more tags for your logs. If those methods are supported by the request object! I am showing here some logs here with X-Request-Id
[2011-10-21 19:57:55] INFO  WEBrick 1.3.1
[2011-10-21 19:57:55] INFO  ruby 2.0.0 (2011-10-19) [x86_64-darwin11.2.0]
[2011-10-21 19:57:55] INFO  WEBrick::HTTPServer#start: pid=1585 port=3000
[9fda80066583f52e695a089d8622439c] 

Started GET "/blogs" for 127.0.0.1 at 2011-10-21 19:57:59 +0530
[9fda80066583f52e695a089d8622439c]  Processing by BlogsController#index as HTML
[9fda80066583f52e695a089d8622439c]    Blog Load (0.2ms)  SELECT "blogs".* FROM "blogs"
[9fda80066583f52e695a089d8622439c]    Rendered blogs/index.html.erb within layouts/application (8.8ms)
[9fda80066583f52e695a089d8622439c]  Completed 200 OK in 32ms (Views: 30.4ms | ActiveRecord: 0.3ms)
[2011-10-21 19:57:59] WARN  Could not determine content-length of response body. Set content-length of the response or set Response#chunked = true
[0962521e4215d645367b58fa41da9f0d] 

Started GET "/assets/application.css?body=1" for 127.0.0.1 at 2011-10-21 19:57:59 +0530
[0962521e4215d645367b58fa41da9f0d] Served asset /application.css - 304 Not Modified (0ms)
[2011-10-21 19:57:59] WARN  Could not determine content-length of response body. Set content-length of the response or set Response#chunked = true
[a7204cec4d2b2e930ac05b41fa1a5c65] 

Started GET "/assets/jquery_ujs.js?body=1" for 127.0.0.1 at 2011-10-21 19:57:59 +0530
[a7204cec4d2b2e930ac05b41fa1a5c65] Served asset /jquery_ujs.js - 304 Not Modified (1ms)
[2011-10-21 19:57:59] WARN  Could not determine content-length of response body. Set content-length of the response or set Response#chunked = true
[202eadd97820dfbf429f87f4725324c3] 

Started GET "/assets/blogs.css?body=1" for 127.0.0.1 at 2011-10-21 19:57:59 +0530
[202eadd97820dfbf429f87f4725324c3] Served asset /blogs.css - 304 Not Modified (2ms)
[2011-10-21 19:57:59] WARN  Could not determine content-length of response body. Set content-length of the response or set Response#chunked = true
[769a2752906bb0c2c5d1eae0a76ac328]
Here I showed some logs in strong. They are the same request for the index page tagged with the same unique id. The same concept for the subdomain. The subdomain will also come as a tag. You can also log some of the custom events in log file with the tags!
Logger.tagged("BCX") { Logger.info "Stuff" }                            # Logs "[BCX] Stuff"
Logger.tagged("BCX", "Jason") { Logger.info "Stuff" }                   # Logs "[BCX] [Jason] Stuff"
Logger.tagged("BCX") { Logger.tagged("Jason") { Logger.info "Stuff" } } # Logs "[BCX] [Jason] Stuff"
How to configure it ?? Open up your production.rb or your custom environment file, uncomment the line for log_tags
config.log_tags = [ :subdomain, :uuid ]
And you will get tagged logs with useful information. Useful links : Commit URL : https://github.com/rails/rails/commit/afde6fdd5ef3e6b0693a7e330777e85ef4cffddb Feature Branch : 3.2 Cheers, @arunagw

Submit a Patch for Rails on Github Using “Fork and Edit Button”

Hi Folks, I have recently written about my Rails Contributions experience here. I see that now days contribution is Rails is increased. People love to contribute in Open Source projects. And the way should be easy not painful. I found that some people are struggling in submitting Pull Requests in Rails on Github. So i thought of writing the same to help them. Some people are new to git and they don’t know much about git… or sometime patch is very small and they want to use Github’s “fork and edit this file” feature to submit a patch. And some people who are good in Rails will do it in more easy manner. And easy to open multiple pull request at a time from the same branch. I am writing some steps to use Github’s fork and edit feature to open pull request.

Open up your project on Github open up file where you want to change

Change your desired things into the file. You can only change one file in one commit
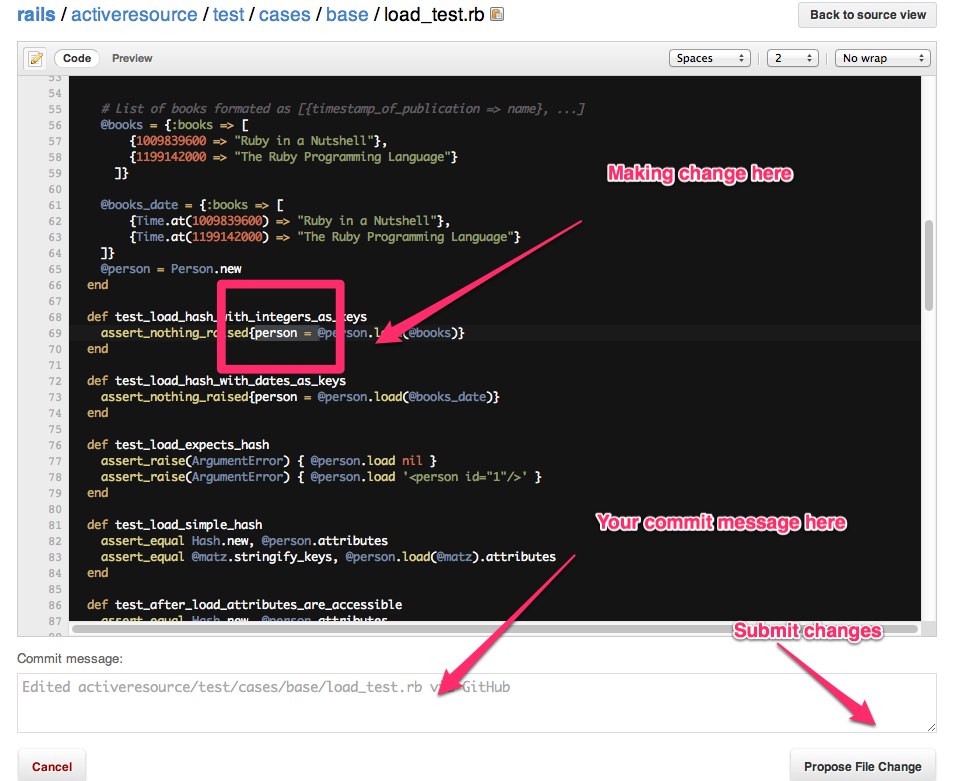
Propese your file changes! Here you can write about your changes. Give some references about issue. Can see the file changed. Can see the commits which you have made.
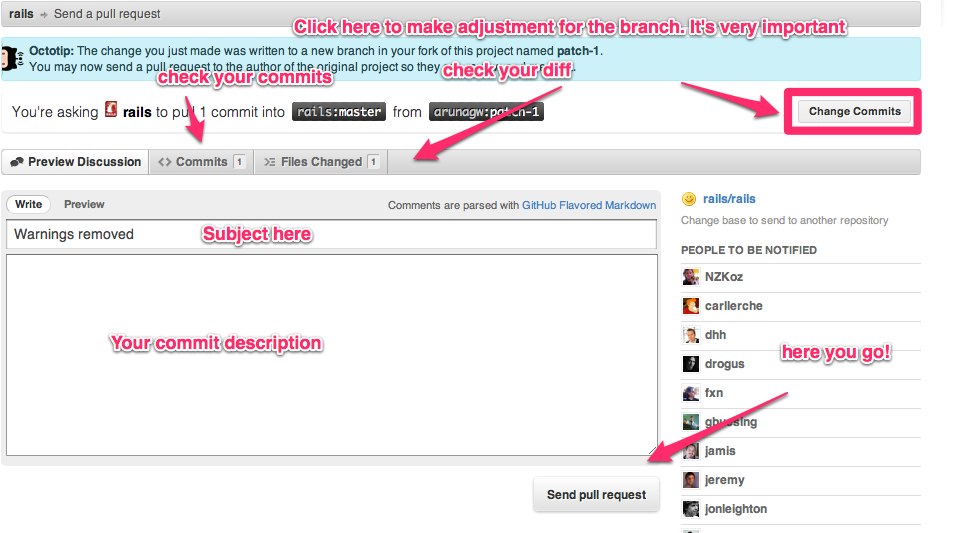
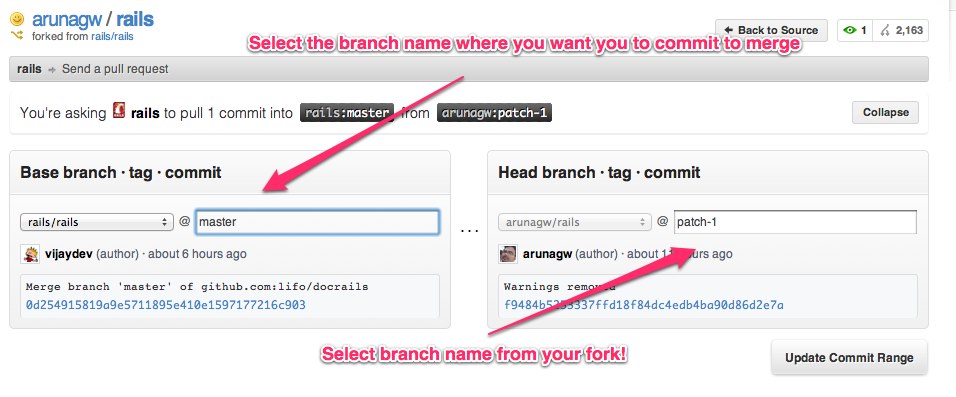
Change commit is the most important part. The reason is when people are doing changes in specific branch. Let’s take a example of Rails. If you are going to submit a patch against Rails 3.0.X version then you must have to choose 3-0-stable branch instead of master in Base branch.

After updating the commit range you can submit the Pull Request and also must see the File Changed.
Use this feature when you are fixing any typos, updating any docs. For submitting any code changes you should be running tests. :-) 

Feel free to ask me if you face any problem in doing these things. We want more contributions!

You can tweet me @arunagw or catch me on my email any time.

Cheers!